Pages

August 26, 2015

Club Scrap Blog Hop - Woven Strands

woven strands blog hop badge photo 0815bloghop_badge_zpsv4rkwswd.jpg

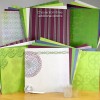
Welcome back, blog hoppers!  I really cannot believe it's the end of August - where did the time go?  The good thing about being at the end of the month is that it's time to share all of the fun projects we've been working on with the Club Scrap Woven Strands collection!

If you traveled here from Roni's blog, then you are following the hop! If you've lost your way or just want to see all the links in one place, head over to the Club Scrap blog to see a list of all the talented bloggers participating today.

I fell in love with the intricate stamps and patterns in the kit this month, and I was inspired to highlight the beautiful artwork in a few ways this month.  I made three cards to show of the amazing designs in this kit:


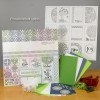
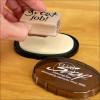
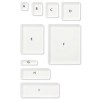
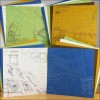
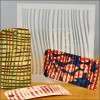
For my first card, I drew inspiration form the delicate knots from the Art Nouveau and the Borders and Background stamp sets and the sentiment on the Collection stamp set.  I wanted to incorporate threads of some sort on this card, so I hand-stitched the variegated fiber from the Embellishment pack and some craft thread I had on hand over the stamped images I had stamped on the background.


I pierced holes in the corners of the stamped images so I could easily sew with a needle and thread.  I finished off with some rhinestone bling on the knots that didn't have any stitching on them, just so they wouldn't feel lonely.  I stamped the sentiment with embossing ink and hematite embossing powder to add a little shine.


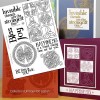
My next card was my attempt at home Celtic-like knots.  I used the white ribbon from the Embellishment pack to create this large knot following these directions I found on Pinterest.


I stamped the "Joy" sentiment with the hematite embossing powder again.  While simple, I love the way the ribbon turned out - weaving it together was pretty fun!


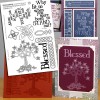
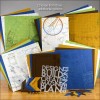
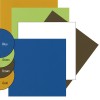
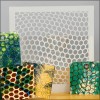
My last card used the large knot panel from the Collection unmounted stamps - I stamped that on my background panel with India Black Ink, then stamped the individual panels on different colors of paper.


I then fussy-cut the colored images out using a craft knife, then adhered the colored knots on top of the panel in their own sections.  I love the way the images pop on this card!

There are so many wonderful techniques you can try with these intricate stamps - I hope you pick them up in the shop and try it out for yourself!

Thank you so much for stopping by, and be sure to head over to Anne Marie's to see what she has to share this month!  Don't forget to swing back around next month when we're working with the Transformations kit - I seriously can't wait for that one!


August 18, 2015

Club Scrap Stencils Challenge

Hello there crafty friends!  It's time again for the Club Scrap Artist team monthly challenge, and we are working with one of my favorite tools, stencils!

If you haven't been lucky enough to work with Club Scrap's stencils and masks, run over to the store and pick up some - you won't regret it (especially since they are on sale).  Each month they come out with amazing designs that can be used over and over again on cards, scrapbook pages, or any project that comes to mind.

I used three different stencils and two different techniques in my two-page layout that I created for this challenge.  I first used a stencil and foil technique I originally saw from Julie Fei-Fan Balzer and I knew it would be perfect with the amazing Club Scrap stencils.

I used rubber cement and foil sheets I bought at Michael's with the Honeycomb and Wavy Lines stencil from Club Scrap to add foil to two border strips that I would be using in my layouts.  Check out my quick video of how this is done below!


Once I had my foil adhered, it is off to put the whole layout together.  I used the 3 of Clubs card from the most recent Idea Deck to help me put this layout together using papers and embellishments from Blueprints.  (And while I flipped through the whole deck and picked this one because it fit what pictures I had and the two strips of paper I was looking for to embellish with foil, I just realized Club Scrap has released these instructions to share as well.  Check out this blog post for more details and try your own hand at this layout!)  I love how the colors in this kit really brought out the colors in my pictures and made them pop off the page.

I put a short process video together showing how this layout came together - be sure to check it out if you are in to that sort of thing!


I love the way that these two sides of the layout came together - and you can't go wrong with a little (or a lot) of gold foil.  Or gold glitter Thickers.


I decided I needed to add a little something-something to the cardstock background on the left side of my layout, so I used the stencil from Nice to See You and this technique to add a little tone-on-tone action.  It brings interest to the background without distracting you from the photos.


I mention this in the video, but the little blue block of cardstock was looking a little plain, so I added in more tone-on-tone interest using the matching stamp from Nice to Know You as well.  Stamping or stenciling in the same color on card stock is a great way to add pattern and interest to a card or layout without being overwhelming.


This kit is a great example of how the theme (Blueprints) does not have to do anything with the subject of your pictures - I was drawn to the bright blue and yellow to bring out the water and the shirt I happened to be wearing that day, and the brown cardstock included in the kit helped to ground everything with a neutral color.


Well, neutral until I added the gold foil.  Which is neutral in a FABULOUS way.

Thanks for stopping by!  Be sure to stop by the Club Scrap blog tomorrow (Wednesday the 19th) to see all of the Artist Team creations.


August 16, 2015

New Zealand Album #1 - Video Flip Through

Happy Scrappy Sunday everyone!  Just stopping in to say that I have a new video up on my YouTube channel showcasing my completed first half of my New Zealand album.  Most of the pages were created using Club Scrap materials and Assembly Line Scrapbooking, but I have some Studio Calico kits and other collections thrown in there for good measure.


I've blogged about some of these layouts before, so if you would like to see still images, check out these posts here:


Hope you might get some inspiration to use up your ALSB layouts you have waiting for the perfect pictures!
09 10