
Welcome back, fellow crafty friends! I hope you have been enjoying the weather and getting some craft time in between getting outside and taking vacations. I was lucky enough to get some scrapping done with Club Scrap's newest collection, Cantina. I was able to create three 2-page layouts and two 1-page layouts, complete with photos, journaling, and embellishments in about 3 hours, start to finish! And I have video to prove it...
If you traveled here from Donna's blog, then you are following the hop! If you've lost your way or just want to see all the links in one place, head over to the Club Scrap blog to see a list of all the talented bloggers participating today.
There are a great many things that I love about Club Scrap - the texture of the paper, the quality and designs of their rubber stamps, the amazingly unique kits they produce each month...but my favorite is the Assembly Line Scrapbooking (ALSB) instructions included in the kits each month. I (nearly) always save my Lite kit to assemble the four 2-page layouts because the instructions are designed to use almost everything included in the kit - no waste!
Some may think that by following the ALSB instructions, you will end up with layouts that look like everyone else's - but the fun thing is matching the photos to the papers and adding embellishments to make the layouts your own unique project. And to show you how you can do this, I created a process video of how I completed all eight pages of the Lite kit, ready to go into my albums!
I know we all are very busy and while I would love to watch scrapbooking process videos all day, I find that I don't always have the time. So if you are interested in a particular Lite layout, you can find the direct link to that section of the video here:
- Layouts 1 and 2: Starts at 0:00
- Layouts 3 and 4: Starts at 13:40
- Layouts 5 and 6: Starts at 18:24
- Layouts 7 and 8: Starts at 27:23
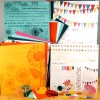
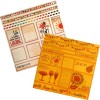
This kit was so fun to work with, and as you can see in the video and the pictures below, so versatile! My first layout showcased some of my fashion choices in childhood:

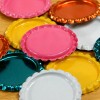
I loved the bottlecap embellishments included with the Lite kit and I always love incorporating circular elements into my layouts - really rounds them out, don't you think? (Aaaaahahahahaha.) Add some glittery ribbon and thickers, and you have yourself a wonderfully fun and girly layout.

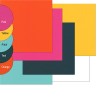
I mention this in the video, but I sincerely love the versatility of these kits each month - who would have thought that this kit would go perfectly with my New Zealand album? The bright colors of this spread really makes the blues of the ocean pop.

I love taking cues for types of embellishments from the existing patterns on the layouts - here I used a combination of circles and arrows to pull both sides of the layout together.

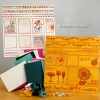
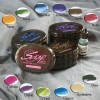
I love the combination of the pink and aqua in the next set of layouts, and it went so well with my pictures of me as a water baby back in the day. I ended up changing the shape of the photo mattes in the left hand side because of the pictures I had on hand, but it just shows how easily customizable these ALSB layouts are.

I didn't have to add too much extra embellishment here, but it helps that I have the perfect letter stickers to go along with the colors of this kit!

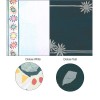
I ended up turning the last set of layouts into two separate layouts for my album - these layouts won't be sitting next to each other, but both work great as stand alone one-pagers.

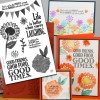
When looking through your kits and seeing how you can embellish your layouts further, don't forget that you can make easy embellishments out of paper - I cut the sun image from a sheet of the patterned paper and made it into a layered embellishment on this layout.

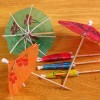
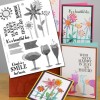
Last but not least, the "Happy Hour" sentiment certainly went well with these pictures of our night on the town in Auckland. It was the perfect layout to include that adorable stamp in homage to the drinks we may have imbibed that night...

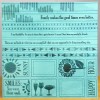
The theme of banners on the patterned papers in this kit really inspired me in my embellishments - just a few snips of the scissors and you have a little cluster of banners on your hands!

Thank you so much for stopping by and checking out my video and my layouts! I'm hoping to get into the habit of documenting my scrapbook process - it was certainly fun to make and I hope it gave you some ideas on how to finish your existing ALSB layouts!
Run, don't walk, over to Tricia's blog to see what she has come up with this month - I'm pretty sure it will be astounding. Be sure to check back next month for the Artist Team challenge and blog hop when we're knot complaining that we get to work with the Woven Strands collection. (Oh, I am too much.)
Supplies:


