If you found your way here from Lisa's blog then you're making your way around the hop! If you're lost or just want to see all of the links in one place, then check out the Club Scrap Creates blog for all your inspiration needs.
I chose to add on the Club Scrap kit to my Lite kit this month because I loved the paper, the stencil, and the stamps so much. I knew I could get a lot of different uses out of the feather stencil and stamp, so I decided to make my own embellishments to use on my layouts and cards.
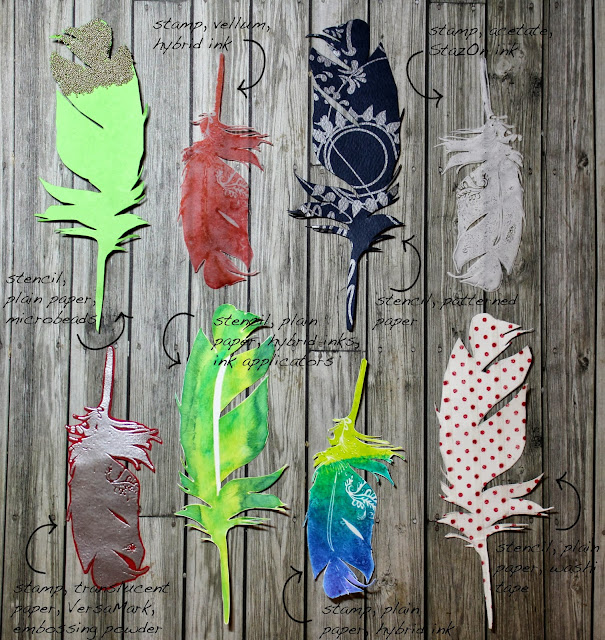
I'm sure there are more combinations you could get out of the stencil and the stamp, but I used the stencil and:
- Traced the feather shape onto the Lime plain paper, cut out, adhered microbeads using Glossy Accents
- Traced the feather shape onto the Blue Patterned paper and cut out
- Used ink applicators and the Club Scrap Hybrid inks on the White plain paper and cut out
- Adhered the washi tape from the Lite kit to the White plain paper and cut out
The feather stamp from the Take Wing Collection Unmounted Rubber is equally as versatile - I used this to:
- Stamp on vellum using the Club Scrap Ruby ink and cut out
- Stamp on acetate (I used cheap overhead projector sheets) with StazOn ink in Cotton White
- Stamp on the Red Translucent paper with VersaMark and heat emboss with silver embossing powder
- Stamp on the White plain paper with the Club Scrap Peridot, Lagoon, and Sapphire inks to create an ombre effect
I combined these different types of feathers into embellishment clusters and used these on my layout:
and my card:
With both the layout and the card, I combined different pre-made feathers into clusters. In my layout, I tried to make a visual triangle around the photos and journaling with my feather clusters. I also made a little tab for my date to live using my Envelope Punch Board - check out my post here on how to make this.
For my card, I let that feather embellished with the microbeads be front and center. I loved the colors in the patterned paper, but didn't want it to compete too much with the feather embellishments, so I toned it down a bit by layering vellum over it - you can still see the great paper, but it's just a bit more subdued. I used embossing powder for the main sentiment just to give it a little more impact. I also let the feathers hang outside the "canvas" of the card because I really liked how that looked - this will probably be a hand delivered card, instead of one I send in the mail.
For my card, I let that feather embellished with the microbeads be front and center. I loved the colors in the patterned paper, but didn't want it to compete too much with the feather embellishments, so I toned it down a bit by layering vellum over it - you can still see the great paper, but it's just a bit more subdued. I used embossing powder for the main sentiment just to give it a little more impact. I also let the feathers hang outside the "canvas" of the card because I really liked how that looked - this will probably be a hand delivered card, instead of one I send in the mail.
Try your hand at making your own embellishments with this awesome kit! I would love to see what you come up with.
Thanks for stopping by! Up next is Annette Dragon and her Digital Musings. Go, say hi, and make sure you stopped at all the blogs along the way! Don't forget to stop by next month to check out Club Scrap's Lock & Key collection.
Supplies // Paper: Club Scrap: Take Wing Kit (Blue plain, White plain, Green plain, Lime plain, Blue patterned, Red transparent, White patterned), From stash: vellum, acetate / Stamps: Club Scrap: Collection UMs, Peacock Greetings, American Crafts: Studio Calico roller date stamp / Inks: Club Scrap Ruby, Leaf, Sapphire, Peridot, Lagoon, Tsukineko StazOn Cotton White, VersaMark, From stash: silver embossing powder / Tools: Cluc Scrap ink applicators, Advantus Tiny Attacher, Club Scrap Take Wing stencil, Ranger Glossy Accents / Embellishments: Club Scrap Take Wing washi, American Crafts Thickers - Scene, Martha Stewart red baker's twine, Martha Stewart Metallic microbeads - White Gold


Great ideas! I know I'll look at my stencils and stamps in a new way now.
ReplyDeleteI absolutely like what you did with the feathers! Such a creative idea. It made your page and card stunning!
ReplyDeleteThank you for showing the versatility of this stencil! So creative!!
ReplyDeleteWowie, wow, wow. You and your scissors make an amazing team. Wonderful ideas--thank you!
ReplyDeleteOMG...love all of the different techniques you used to create the feather embellishments. (That must have taken a LOT of patience, but totally worth it!)
ReplyDeleteDang girl...do you have scissor hands? Awesome job, by the way where were the photos taken? So pretty!
ReplyDeleteMarya, those feathers are simply amazing and so beautiful. Love the way you grouped them together. Makes for such an impact on your card and page. And thanks for the date tab tutorial too!
ReplyDeleteThanks for all your wonderful feather embellishments, great ideas, every one!
ReplyDeleteCongratulations on your first blog entry for Cs. Great ideas and love the feathers.
ReplyDeleteOMG! I love the feather on acetate and vellum. They look so precious! Thanks for the inspiration.
ReplyDeleteWonderful ideas and cards, feathers are great
ReplyDeleteYour take on all the different ways to make a feather is wonderful. Your layout and card are lovely. Thank you for the great ideas!
ReplyDeleteYou did a great job with that stencil and your feathers.......thanks for sharing.
ReplyDeleteLove your feather embellishments, nice LO and card; tfs!
ReplyDeleteThese r great ! I'll have to try making some ;)
ReplyDeleteBoy you were busy with this kit! LOVE all of your ideas and inspiration!!
ReplyDeleteWow, love all the feather looks and techniques you've created, so awesome!
ReplyDeleteYou made great embellishments for your beautiful layout and cards. Thanks for documenting each technique on one sheet. Also, your cutting skills are great.
ReplyDeleteNice cards. I know I'll use some of your ideas.
ReplyDeleteCreative work.
ReplyDeleteMelissa (over via Tiare at SOC)
how creative! Totally out-of-the-box!
ReplyDeleteReally fantastic ideas!! Great work!!
ReplyDelete