So, even though I've never seen any of the Minion movies, I thought these pictures were so fun and festive. I loved the colors and it seemed like our Minion friends were having a great beach party - and I was inspired to make something equally as festive:
Oh yeah, nothing says party like presents.
The Club Scrap kit this month, Cantina, was a perfect match for the festive inspiration pictures. I made the gift box, the pillow box, and the card just using elements from the Deluxe kit.
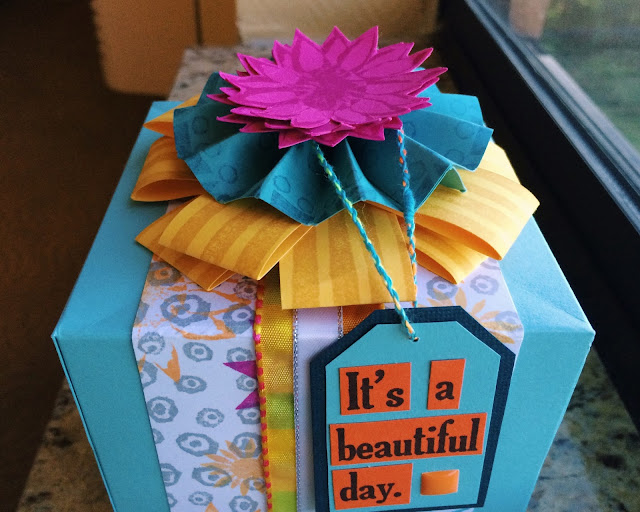
The gift box was really fun to make and a challenge to see how many elements from the Deluxe kit I could incorporate into one project without being too overwhelming! I made a 4x4 inch box using the handy-dandy directions found on my scoreboard, then attached elements to the removable lid of the box. No unwrapping needed! I stamped several images from the Collection, Borders & Backgrounds, and Art Nouveau stamps onto white paper to make my own "wrapping paper", then used a few ribbons from the Embellishment pack to add a few more layers of texture. The tag was simple to make and I used a sentiment from the Collection stamps to create the message. An enamel shape and a fiber to attach it to the gift finishes the tag off!
The icing on the cake...er, the cherry on the sundae...no, the BOW on the PRESENT was the most fun to make. I first stamped the stripes image from the Art Nouveau stamps on a 4x12 inch strip of the Yellow paper using Topaz ink, then scored down the middle vertically. I then cut this into 1x4 inch strips. I adhered the ends closed to give them a little volume, then staggered the pieces into a bow shape.
The next layer is a handmade rosette using the Aqua patterned paper. This is a 1.5x12 inch strip that was scored every half inch, then formed into the rosette. Rosettes are great, but VERY hard to adhere. I had to bring out the heavy duty adhesive - hot glue - for this guy.
Finally, I stamped the flower image from the Art Nouveau stamps onto the Pink paper with Fuchsia ink and fussy-cut three flowers out for the very top. I love the combination of patterns and colors in this kit!
 I had so much fun withe the first gift box, I had to make a second! This time I made a pillow box with the help of the pillow box punch board - I never knew I needed this tool until I bought one! I made my own patterned paper by stamping that wonderfully wonky stripe stamp on to the Orange paper, then I followed the instructions on the pillow box score board to make an 8-inch box. I made a floral layered belly band to slip around the box - this was totally inspired by the tropical flowers the Minions were wearing!
I did A LOT of fussy cutting for this present, but it was worth it because I love the results. I used the flower, vine, and leaf stamps from the Borders & Backgrounds and Art Nouveau stamps with Fuchsia, Neon Orange, Topaz, Ocean, and Leaf inks to create all of my layered elements, then arranged them together and decorated the flowers with the button brads from the Embellishment pack. I stamped this amazing sentiment from the Collection stamps on a strip from the cutaparts - I love figuring out different ways to incorporate cutaparts in my projects!
Finally, what's a present or two without a card? I was so impressed with Kay's post here using the amazing stencil from the Deluxe kit that I had to try my own hand at it. I added a few hand drawn details - I used a thin marker to outline all of the images and to draw a purposely wonky frame. I didn't have the Greeting stamps with me, so I opted to try my hand (no pun intended) at a hand-lettered sentiment - and I love the results! Those enamel shapes came in handy again to add a little dimension and shine to finish the card off.
Now all I need are some Minion-related items to fill the presents with, and I should be good to go! I hope you might try making your own gift wrap using some of the ideas here, and if you are looking for some more Minion inspired craft, be sure to check out the lovely ladies below!


Wow, such wonderful projects, Marya. Love all those flower arrangements
ReplyDeleteand cheers to a wionderful finished challenge!
Such a fun array of summery goodness! My favorite by far though are the button flowers - so very pretty!
ReplyDeleteLove the box and bow! The hand drawn edging around the stencil elements really make them pop!
ReplyDeleteGorgeous boxes! Love the card!
ReplyDeleteI especially love the card, Marya. Great job on the hand-lettering!
ReplyDeleteMarya, you outdid yourself with all of these clever items!! I love how you made the bow on the box out of papers!!
ReplyDeleteLovely set of goodies! That card is super happy!
ReplyDeleteOh, gee, wizz! This is all fantastic and fun! Thank you for posting these inspiring ideas!
ReplyDelete