Pages

December 27, 2013

Club Scrap Blog Hop - Aspen

Aspen Hop Badge photo AspenHopBadge_rev_zpsbf13f7fe.jpg

Hello!  Welcome to the December edition of the Club Scrap blog hop!  This month we're crafting with the wintry Aspen collection.  I'm going to show you how I used elements of this kit on a traditional layout and a pocket-style scrapbook page.

If you traveled here from Lisa's blog, then you are following the hop!  If you've lost your way or just want to see all the links in one place, head over to the Club Scrap Creates blog to see a list of all the talented bloggers participating today.


I have a lot of ideas of what I want to get accomplished in 2014, crafting-wise, and one of them is to get all of my old pictures into albums.  I'm a little overwhelmed with what I have to tackle on these, so I think I'm going to slip most of these pictures into pocket page protectors like these.  I was able to use many elements from this month's kit to create 4x6 and 3x4 cards that I then used on these both on a traditional 12x12 layout and in the pocket page protector.


My original inspiration came from this layout here - instead of using pre-made 3x4 cards, I created my own with the papers in the Aspen kit and all of the goodies that came along with it!


Some of my favorite supplies in this kit include the mica handmade paper and the wood veneer sheets.  And the chevron ribbon.  Oh, and the buttons.  Really, pretty much everything.  This is a pretty simple page for me, but it helps to not complicate things to much when you are going to pair this with a very linear page next to it using the pocket page protector.


I was able to get a lot of photos into these pockets pretty easily - I only had to cut a few down to size to fit into the smaller pockets in the middle.  I had a lot of fun trying to see how I could fit elements like the stickers and the die cut frames on this side of the page.


I think my favorite part about this side is the 3x4 wood veneer card I punched out.  I also ended up using the stars that I punched out on the traditional 12x12 layout, so I got a lot out of this piece of wood veneer and the punch!  Depending on what I put on the reverse side of this page, I might line the back of the card with washi tape so it peeks through the cutouts, or just leave it transparent.  I'll make a decision when I get there!

Thank you again for coming back and checking out what you can accomplish with Aspen and a little time on your hands!  Head on over to Annette Dragon's to see what she has been working on.  Join us again in 2014 when we kick off January with Club Scrap's Graffiti collection!

Supplies // Paper: Club Scrap Aspen: Almond Plain, Blue Pattern, Green, Almond, and Aqua Patterned Paper , Handmade Mica / Stamps: Club Scrap Aspen Collection UM, Art NouveauInks: Club Scrap Sandstone, India Ink / Tools: Martha Stewart Starry Sky Punch, Pocket Page protectors Embellishments: Club Scrap: Wood Veneer Sheets, Tags & Cutouts, Stickers, Chevron Twill, Buttons

December 14, 2013

Club Scrap Blog Hop - Gnome for the Holidays

Gnome Hop Badge photo GNOME_HopBadge_zps62fc7863.jpg

Happy Holidays and welcome to a special edition of the Club Scrap blog hop!  Club Scrap has released their 2013 holiday kit, Gnome for the Holidays.  I got a lot of use out of the stamps in this kit and was able to make my holiday wrapping paper and gift tags even more festive!

If you traveled here from Annette's blog, then you are following the hop!  If you've lost your way or just want to see all the links in one place, head over to the Club Scrap Creates blog to see a list of all the talented bloggers participating today.

My good friend Anne Marie pitched this idea while we were eating dinner at this year's August Retreat, and we all had a great time and lots of laughs trying to think of "punny" names.  I love how this kit turned out!


I used the stamps, some brown paper packaging and string to make my wrapping paper and tags for my gifts this year.  I really like the look of kraft paper and baker's twine, so I decided to stamp on the paper before wrapping the presents to make it homemade.


I also used the stamps to make little gift tags for the presents as well.  I tried a couple of techniques - one was paper piecing.  I simply stamped the image three times, once on red paper, once on green, and once on white, then cut the pieces out and reassembled.  This gives a nice dimensional look to the image and no coloring is required!


I did the same thing for the gnome tag, but used some patterned paper instead.  I think I like this combination on the wrapping paper the best - there is something about a white image on the kraft paper that makes me happy


I also tried out the chalkboard technique I demonstrated in my last post - I think this makes for a really fun gift tag!

Short, sweet, and simple, but who needs additional stress during the holidays?  Try these ideas out if you are looking to add a handmade touch to your gifts this year.

Up next on the hop is Hetty from the Netherlands!  Be sure to stop by and wish her the best of the season.

Have a safe, wonderful, and happy holiday!

Supplies // Paper: From Stash: Kraft wrapping paper / Inks: Club Scrap Earth, White Pigment, India Ink, Spruce, WOW Red / Stamps: Gnome for the Holidays / Embellishments: Baker's Twine

December 1, 2013

December Card Sketch and Technique Challenge


This month over at our card sketch challenge at Club Scrap, Anne Marie and I decided to change it up a bit and do a sketch and technique challenge.  Come play along - use just the sketch or try your hand at the chalkboard technique!

Chalkboard is all over the scrapbooking and decorating world - just check out Pinterest any day and you are sure to see something!  There are a lot of tutorials out there on how to achieve this look, but I wanted to see how I could recreate this trend using primarily Club Scrap products.  This technique was a lot of fun to try out - it really helped me look at my plethora of stamps in a different way and how I could incorporate different stamps into a cohesive final product.  Here's a quick look at how I created this card:


First thing is to cut out your panel that you will be using for your chalkboard background.  I used black cardstock, but you could use any dark color - gray or the traditional chalkboard green come to mind.  I cut this panel to 2.5 x 3.5 inches for this particular sketch. You will be using white embossing powder, so I swiped my embossing buddy across the cardstock so the powder will end up exactly where I wanted it.  This is important since the white powder will definitely stand out on the dark background.


I first tried out the design I had in mind on a scrap piece of paper - this will help me when I'm using clear VersaMark on the black cardstock.  I used stamps from Give Thanks and from the new Neon Doodles stamp set - look for "hand-drawn" looking stamps to assist with the illusion of chalkboard art.  Following my "sketch", I stamped with the clear ink.  I stamped one image at a time since I was using the same stamp several times on the same panel, but if you are able to use a single collage image or create your own using several stamps, go right ahead and stamp it all at once.


Once I stamped with the clear ink,  I poured the white embossing powder on my images and used a fine brush to clean up the images a bit.  Be careful at the step - the powder attached to the ink is not set yet and can easily be moved.  I concentrated on the more open areas where the powder was still sticking a bit.


Heat set the powder and your main image is done!


I added some color to my panel at this point with a colored pencil.  I would recommend one to two colors, or you can keep it simple and add some lines with just a white pencil.  I picked blue to compliment the cardstock I knew I would be using on the rest of the card.


The next step is to add the "shadow" to your image - this helps to make the image look like it's drawn on with chalk.  You will be using the same stamps you used with the embossing powder with white pigment ink this time.  This second image will be slightly offset from the embossed image, so I used a Stamp-A-Ma-Jig to help with placement since I'm using rubber stamps.  If you are using clear stamps, this tool might not be necessary, but I find it helpful if you like to be exact with your placement.

I stamped the same images slightly offset from the embossed images - you can see this better in the completed card above.


Club Scrap makes a lot of great "noise" stamps.  I used this one from the Full Circle Jr. kit to make a chalky background on my cardstock.  A stark black background won't help with the illusion of chalkboard art - you have to make it look like it's been erased a few times and the chalk dust is still lingering.  I inked this background stamp up with the white pigment ink again and stamped directly over the image and came away with a subtle background that I loved.  Look through your collection of stamps - I'm sure there are a lot of background stamps that would lend themselves to this technique.


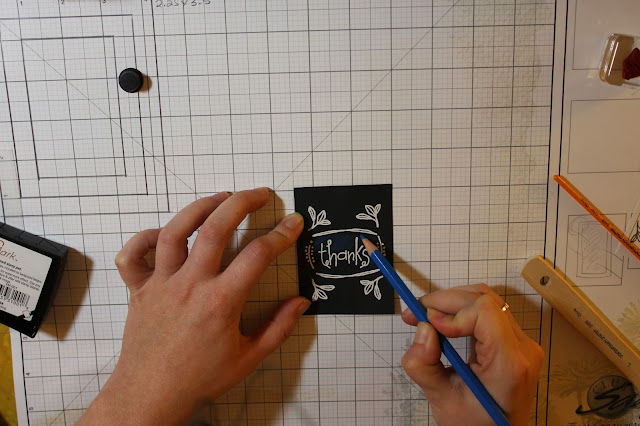
One other technique that will help with the hand-drawn look of this card is to actually hand-draw!  I added a rectangular frame around my image with a white colored pencil and a clear ruler.


The final step is to add some white pigment ink around the edges of the panel.  I used an ink applicator so that the ink was softened a bit.  I also added a little of this ink directly to the panel in places where I felt that the background stamp was lacking a bit.

And that's it!  Add your completed panel to your card using the sketch found here and you are all set.  Hope you can look through your collection of stamps and see what combinations you can come up with.  Can't wait to see what you create!

ETA: Go check out Julie's post here on how to make cards using this sketch and her ALCM (Assembly Line Card Making) steps!  It's super cool.

Supplies // Paper: Club Scrap Fire & Ice Turquoise, Welcome Gray, From Stash: Club Scrap Black paper / Inks: Club Scrap Neon BlueWhite Pigment / Stamps: Club Scrap Neon Doodles, Give Thanks, Full Circle Jr.Tools: Club Scrap Acrylic Ruler, Ink Applicators; Inkadinkado Stamp-A-Ma-Jig, Embossing Buddy, White embossing powder, VersaMark / Embellishments: Sequins, Binder clip, American Crafts Glitter Ribbon in Silver, Bella Blvd Decorative Tape in Teal Stripe, colored pencils

November 27, 2013

Club Scrap Blog Hop - Fire & Ice

 photo 1113FireIce_HopBadge_rsz_zps4fd1904e.jpg


Hi there!  Welcome to the November edition of the Club Scrap blog hop!  This month we're creating with the oh-so-hot and super-cool Fire & Ice collection.  I'm going to show you how I added some dimension to my scrapbooking pages using the stencil from the kit and some items I had in my stash.

If you traveled here from Lisa's blog, then you are following the hop!  If you've lost your way or just want to see all the links in one place, head over to the Club Scrap Creates blog to see a list of all the talented bloggers participating today.


I'm a big fan of themeless kits - I love being able to let the colors and patterns in the paper compliment my photos and let the pictures tell the story.  The great thing about Club Scrap kits is, even if there is a "theme" per se, I can always make the photos I have on hand work.  I consider this one of their themeless kits - Fire & Ice is a little abstract and the colors and patterns speak for themselves.

But this time I the perfect photos to go with the themeless theme!  Seriously.  Perfect.

Fire


 And Ice!

Yeah.  Like I said - perfect!


While we were in Queenstown, we went to an ice bar there - the bar, the chairs, the tables, even the glasses were made of ice!  We got to bundle up and hang out in negative degrees with our drinks.  Cleverly, once you were done with the ice bar, they gave you drink coupons to the bar next door - The Boiler Room!  There were cozy fireplaces all over and we warmed our hands by the open flame with drinks in hand.


I knew I wanted to try a lot of different techniques with my stencil, and one of the ideas that came to mind was using the stencil as a guide for stitching.  I poked holes at each corner of the design and then used a backstitch to sew onto the paper using craft thread I had in my stash.


Despite all of the stitching, this was a pretty relaxing process and I really like the results!  I kept the stencil in place on the paper using washi tape while I stitched - this allowed me to keep track of the pattern much easier!


I loved using this icy paper for the background paper - it really helped to convey how cold it was in there!  To add some texture to this side of the layout, I used the stencil and some home made gesso on the panels to the left.  The gesso is pretty dimensional, so it gave some interest to this side of the page.


On the right side of the layout, I carried over the stencil but used a dry embossing technique on the last panel.  Using a light board, I placed the paper over the stencil an used a stylus to gently deboss the pattern into the paper.  Flip it over, and you have handmade embossed paper!  I highlighted the embossing by swiping over the raised surfaces with a Club Scrap ink pad in Lagoon.  You can see the embossed pattern a bit better below:


This stencil was so fun to play with and I can't wait to try these techniques out with the other fabulous stencils Club Scrap has.

Thank you so much for stopping by!  Head on over to Annette Dragon's to see what project she has up her sleeve.  Don't forget to come back in December when we showcase Club Scrap's Aspen collection!

Supplies // Paper: Club Scrap Fire & Ice: Turquoise, Red, Navy, Yellow, Navy, Orange Print, 8.5x11 Orange Print, From Stash: Club Scrap White paper / Inks: Club Scrap Earth, Lagoon, Sapphire, White Pigment / Tools: Club Scrap ink applicators, Fire & Ice stencil, We R Memory Keepers Paper Piercing Tool, Embossing Stylus / Embellishments: Club Scrap: Destinations Stickers, From stash: Basic Grey Eva chipboard stickers, Thickers - Journal, Homemade Gesso, Craft Thread

October 30, 2013

Club Scrap Blog Hop - Lock & Key

 photo LockKey_BlogHop_badge_rsz_zps419e832f.jpg

Hey you!  Welcome to the October edition of the Club Scrap blog hop!  This month we got to hoard, I mean, use the gorgeous Lock & Key collection.  I made an eclectic mini album with some of the fantastic goodies that are available in this kit.

If you've wandered over here from Lisa's blog, then you are on the blog hop trail!  If you've lost your way or just want to see all the links in one place, head over to the Club Scrap Creates blog to see a list of all the talented bloggers participating today.


When I saw the theme for this month's kit, I knew I wanted to to use to scrap some of my pictures from my trip to New Zealand.  I took a lot of pictures while I was there, but I think the most I took in once place was when we went on the Hobbiton movie set tour.  The nerd in me just couldn't help herself.  I'm working on my traditional scrapbook album of the entire New Zealand adventure, but all of the Hobbiton pictures didn't make the cut for that.  So instead of having the remaining photographs sit in a drawer somewhere, I decided to make a mini album devoted just to Hobbiton.

There were so many cool embellishments and beautiful colors in this collection that I had an easy time incorporating these into an album.  I started out by creating my own covers to the album by cutting four pieces of chipboard into 6.5x8.5 pieces, then gluing two of the pieces together to make a double thick rectangle of chipboard.  (I used the kind of chipboard that comes with my orders of paper - any type of relatively stable cardboard will do.)  I wrapped each of the covers with papers from Club Scrap's Pattern Basics, which are such an ease to work with for wrapping!  Just the right weight so your finished product looks great.  If you're new to wrapping or need a refresher, be sure to check out Tricia demonstrating this technique here.


I wanted the basic size of the album to be about 6x8, but I also wanted some of the pages to extend past the outside edge of the album to add some interest.  On the cover I used the AMAZING 12x12 stencil that came with my Lite kit and gold mist.  I also took advantage of this free printable for this kit and printed this on tan cardstock so I could use them throughout my album.  Printables are fun to work with - I find that if I ink the edges of the cutaparts that it tends to look more cohesive with the rest of the collection.

Click to enlarge!


One of the things I liked about having a separate mini album is that I didn't feel the need to do too much journaling since I knew I would be journaling in my main album.  That way I could just put lots of pictures in with no worries!  I created a couple of pockets to house extra photos by using the printed bags that came with the kit and by making a pocket out of acetate paper and washi tape - both types of pockets make this album interactive! This album is still a work in progress since I have a pile of pictures left, but I'll be able to add a page or two here and there thanks to the binder rings I'm using to keep it all together.


Thanks for stopping by!  Your next stop on the hop is Annette Dragon.  Go check out her take on Lock & Key and make sure to stop at the other blogs along the way.  Next month we will get to play with Fire & Ice, so come say hello again in November!

Supplies // Paper: Club Scrap Lock & Key Copper, Teal, Dark Brown, Teal Print, Pattern Basics Neutrals, From stash: tan, acetate / Inks: Club Scrap Earth / Tools: Club Scrap ink applicators, Lock & Key stencil, Cropodile Big Bite / Embellishments: Club Scrap: Comfort Zone Library Cards, Bookshelves Library Card Pockets, Lock & Key Printed Bag, Metallic Sunbursts & Mini Brads, My Mind's Eye Indie Chic - Birds washi, Prima Metal Paper Clips - Key, We R Memory Keepers Baker's Twine - Neutral, Heidi Swapp Gold Lame mist, Studio K Black Label Alphabet, Thickers - Muse, eyelets from stash, American Crafts Slick Writer Pen,

October 27, 2013

Happy Fall!


Whoa, October has been busy and crazy, but I'm trying to get back on the crafting train.  Luckily this past week I received cards from the Halloween/Fall swap I was participating in at Club Scrap and it definitely helped with inspiration.  Look at these amazing cards I got back!

I had fun making my cards too - when you're making a lot of duplicate cards at once, you don't want it to get too complex, but I still want to have the final product be interesting.  It was fun looking through all my stamps to try to find something autumnal to use.


I really wanted to create a plaid panel for this card so I used the technique in this video to make it.  (BTW, whenever I feel a little uninspired, I usually spend an inordinate amount of time watching scrapbooking videos - my favorites are here, here, and here.)


I used a different stamp than the one in the video, but this technique is so fun - definitely something I'll be using again if I need to make a more masculine card.

I signed up for the Christmas card swap as well, so I need to start getting those completed soon!  Pinterest, here I come.

Supplies // Paper: Club Scrap Mirror, Mirror, All That Jazz, Matrix, light orange, dark green, kraft and cream from stash / Stamps: Club Scrap Brewed Awakenings, Give Thanks, Welcome, Paper Smooches Sentiment Sampler / Inks: Club Scrap Leaf, Tangerine, Topaz, Earth, India Ink

October 1, 2013

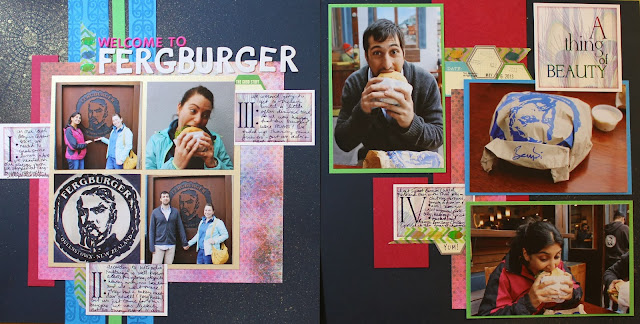
Welcome to Fergburger...


...home of the Fergburger, can I take your order?  Anybody?  Anybody?

I'm finally trying to tackle all of my New Zealand pictures and my issue with vacation photos is that I like to get a lot of pictures on my layouts - some days I can go for one picture layouts, but I feel like my vacation album should be chock full of pictures.  That's why I like turning to Club Scrap's sketches - they usually provide a lot of room for photos and embellishments and look good too.


September's sketch challenge was using Take Wing's monthly sketch, so I used that for this page.  I just grabbed some coordinating papers and took off!


I wanted to use some of Pattern Basics papers, so I grabbed some plain cardstock that would compliment it.  I used up some of my leftovers from the Peacock kit and added some stamping with the Tribal stamps.  I gussied up the background with some mist and a mask.


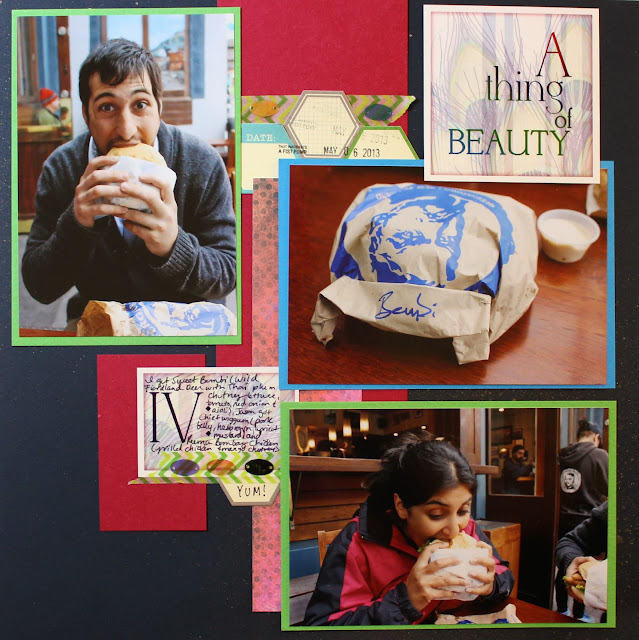
The mist was a bit more subtle on the second page, but there was a lot more real estate being used by photos and paper that I was OK with that.  These colors were so much fun that I thought they really helped with the mood of the page - even though it was cold and rainy this day in Queenstown, we were so happy to be chowing down on gigantic burgers.  Because obviously food = fun.

Supplies // Paper: Club Scrap Aurora Borealis, All That Jazz, Peacock (green, blue, and gold), Pattern Basics Brights / Stamps: Club Scrap Tribal Borders & Backgrounds, K&Company Smash roller date stamp / Embellishments: Heidi Swapp Gold Lamé Color Shine, Studio Calico Circle Graph mask, Jillibean Soup Memorable Hexies, washi from stash, Peacock sequins, Peacock cutaparts, Meagan Elizabeth White Cloud alphabet stickers, pink letter stickers from stash


September 30, 2013

Triple Whammy: Christmas, NBUS, and Card Sketch Challenges


I love participating in challenges - they get my thinking outside of the box and actually using my stash!  I used this card to participate in three challenges over at Club Scrap - Mary's Christmas challenge, Pam's NBUS (Never Before Used Stuff) Challenge, and Anne Marie and my card sketch challenge.  It was fun trying to think of a way to incorporate all three into one card!  This is the second card I made with September's sketch - check out the first one here.

And since tomorrow is the first day of October, there will be a more challenges to look forward to!

Supplies // Paper: Club Scrap Lodge, WOW Holiday 2012, Take Wing (Red) / Stamps: Club Scrap WOW Holiday 2012, Welcome Get Comfy (Club Stamp) / Embellishments: Waxed linen thread, Martha Stewart Baker's Twine / Inks: Club Scrap Onyx, Spruce, White Pigment

September 25, 2013

Club Scrap Blog Hop - Take Wing


Hello, and welcome to the September edition of the Club Scrap blog hop! This month we're playing with Club Scrap's Take Wing collection. I'm going to show you how to make handmade embellishments for your pages and cards with the stamps and stencil in this month's kit.

If you found your way here from Lisa's blog then you're making your way around the hop! If you're lost or just want to see all of the links in one place, then check out the Club Scrap Creates blog for all your inspiration needs.

I chose to add on the Club Scrap kit to my Lite kit this month because I loved the paper, the stencil, and the stamps so much.  I knew I could get a lot of different uses out of the feather stencil and stamp, so I decided to make my own embellishments to use on my layouts and cards.


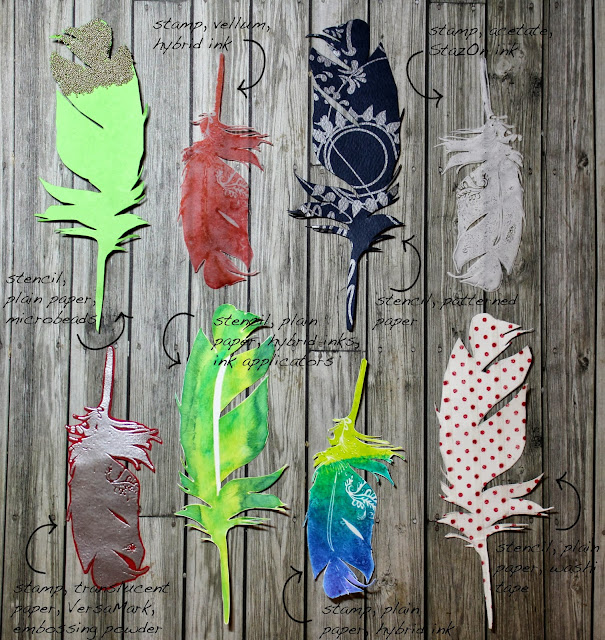
I'm sure there are more combinations you could get out of the stencil and the stamp, but I used the stencil and:
  • Traced the feather shape onto the Lime plain paper, cut out, adhered microbeads using Glossy Accents
  • Traced the feather shape onto the Blue Patterned paper and cut out
  • Used ink applicators and the Club Scrap Hybrid inks on the White plain paper and cut out
  • Adhered the washi tape from the Lite kit to the White plain paper and cut out
The feather stamp from the Take Wing Collection Unmounted Rubber is equally as versatile - I used this to:
  • Stamp on vellum using the Club Scrap Ruby ink and cut out
  • Stamp on acetate (I used cheap overhead projector sheets) with StazOn ink in Cotton White
  • Stamp on the Red Translucent paper with VersaMark and heat emboss with silver embossing powder
  • Stamp on the White plain paper with the Club Scrap Peridot, Lagoon, and Sapphire inks to create an ombre effect
I combined these different types of feathers into embellishment clusters and used these on my layout:


and my card:


With both the layout and the card, I combined different pre-made feathers into clusters.  In my layout, I tried to make a visual triangle around the photos and journaling with my feather clusters.  I also made a little tab for my date to live using my Envelope Punch Board - check out my post here on how to make this.


For my card, I let that feather embellished with the microbeads be front and center.  I loved the colors in the patterned paper, but didn't want it to compete too much with the feather embellishments, so I toned it down a bit by layering vellum over it - you can still see the great paper, but it's just a bit more subdued.  I used embossing powder for the main sentiment just to give it a little more impact.  I also let the feathers hang outside the "canvas" of the card because I really liked how that looked - this will probably be a hand delivered card, instead of one I send in the mail.


Try your hand at making your own embellishments with this awesome kit!  I would love to see what you come up with.

Thanks for stopping by!  Up next is Annette Dragon and her Digital Musings.  Go, say hi, and make sure you stopped at all the blogs along the way!  Don't forget to stop by next month to check out Club Scrap's Lock & Key collection.

Supplies // Paper: Club Scrap: Take Wing Kit (Blue plain, White plain, Green plain, Lime plain, Blue patterned, Red transparent, White patterned), From stash: vellum, acetate / Stamps: Club Scrap: Collection UMs,  Peacock Greetings, American Crafts: Studio Calico roller date stamp / Inks: Club Scrap Ruby, Leaf, Sapphire, Peridot, Lagoon, Tsukineko StazOn Cotton White, VersaMark, From stash: silver embossing powder / Tools: Cluc Scrap ink applicators, Advantus Tiny Attacher, Club Scrap Take Wing stencil, Ranger Glossy Accents / Embellishments: Club Scrap Take Wing washi, American Crafts Thickers - Scene, Martha Stewart red baker's twine, Martha Stewart Metallic microbeads - White Gold

September 24, 2013

Make Your Own Tabs - and a Sneak Peek!


Sneak peek time!  Stop back tomorrow to see what I have up my sleeve with Club Scrap's Take Wing collection.  I created a cute little tab for my project using the Envelope Punch Board.  It's really quick and simple if you have this tool!  Check out these videos if you want to see what else this can do.


I first took a scrap piece of paper that I wanted to use to match my project and lined the left edge in the center of the punch.  I punched that out to get the first curved edge.


I then stamped my date on the scrap and cut it down to size.  (This was actually my second attempt - the first one came out a bit wonky.  Good thing paper has two sides!)  I again lined the left side up in the middle of the punch and punched away.


I edged the tab with ink to give it some dimension - easy peasy!  I'll definitely be using this when I need to make a tab in a hurry.

Don't forget to see the completed project tomorrow, right here!
09 10