Pages

Showing posts with label cards. Show all posts

August 26, 2015

Club Scrap Blog Hop - Woven Strands

woven strands blog hop badge photo 0815bloghop_badge_zpsv4rkwswd.jpg

Welcome back, blog hoppers!  I really cannot believe it's the end of August - where did the time go?  The good thing about being at the end of the month is that it's time to share all of the fun projects we've been working on with the Club Scrap Woven Strands collection!

If you traveled here from Roni's blog, then you are following the hop! If you've lost your way or just want to see all the links in one place, head over to the Club Scrap blog to see a list of all the talented bloggers participating today.

I fell in love with the intricate stamps and patterns in the kit this month, and I was inspired to highlight the beautiful artwork in a few ways this month.  I made three cards to show of the amazing designs in this kit:


For my first card, I drew inspiration form the delicate knots from the Art Nouveau and the Borders and Background stamp sets and the sentiment on the Collection stamp set.  I wanted to incorporate threads of some sort on this card, so I hand-stitched the variegated fiber from the Embellishment pack and some craft thread I had on hand over the stamped images I had stamped on the background.


I pierced holes in the corners of the stamped images so I could easily sew with a needle and thread.  I finished off with some rhinestone bling on the knots that didn't have any stitching on them, just so they wouldn't feel lonely.  I stamped the sentiment with embossing ink and hematite embossing powder to add a little shine.


My next card was my attempt at home Celtic-like knots.  I used the white ribbon from the Embellishment pack to create this large knot following these directions I found on Pinterest.


I stamped the "Joy" sentiment with the hematite embossing powder again.  While simple, I love the way the ribbon turned out - weaving it together was pretty fun!


My last card used the large knot panel from the Collection unmounted stamps - I stamped that on my background panel with India Black Ink, then stamped the individual panels on different colors of paper.


I then fussy-cut the colored images out using a craft knife, then adhered the colored knots on top of the panel in their own sections.  I love the way the images pop on this card!

There are so many wonderful techniques you can try with these intricate stamps - I hope you pick them up in the shop and try it out for yourself!

Thank you so much for stopping by, and be sure to head over to Anne Marie's to see what she has to share this month!  Don't forget to swing back around next month when we're working with the Transformations kit - I seriously can't wait for that one!


February 14, 2015

Club Scrap Blog Hop - Valentine's Day!

 photo Vday Hop_zpscnsd2lu5.jpg

Happy Valentine's Day (or belated Galentine's Day for you Parks and Rec fans).  What better way to share the love than on a Club Scrap blog hop?

If you found me through Tricia's blog, then you are following the hop! If you've lost your way or just want to see all the links in one place, head over to the Club Scrap blog to see a list of all the talented bloggers participating today.  You can even share your own lovely love creations with a link up on and giveaway the Club Scrap blog - make sure to read the how-to there and show off your stuff!

So, I am a procrastinator by nature, and my good friends from high school and I have been exchanging holiday cookies via the mail.  I had every intention of sending these out around, y'know, the holidays, but in between an interstate move and my decidedly slow rate of unpacking, I didn't get around to it.  So I thought I would send them as New Year's cookies.  Nope.  How about Groundhog's Day cookies? Errrr, not so much.  So I finally scheduled time on my calendar to make the darn things and they are now Valentine's Day cookies.  Of course they required Valentine's Day cards to accompany them.  Enter Club Scrap and their wonderful stamps!

Club Scrap has released several wonderful love-themed kits and stamps over the years (such as this year's Love Ink collection, and the previous Love Blooms and Love Bites sets), but their everyday stamps work just as well in creating beautiful Valentine's Day cards.   I have five cards I'll share with you today that showcase a lot of different stamps and techniques!


First up is a card that I made with a repeating phrase in ombre colors.  It's a pretty simple card, but I angled the phrase from Love Blooms to give it some interest.  I used my Stamp-A-Ma-Jig to make sure I was placing the words exactly where I wanted them.  I also used only three colors of ink on this card - I ended up with the five different shades by using both the first- and second-generation impressions of the stamp to get the lighter shades of each ink.  You can kind of tell that there were a few stray ink marks on the white paper, so instead of sending this panel to the circular file, I took three colors of watercolor pencils and my waterbrush and flicked the color from the nib of the pencil onto the paper.  It made for a pretty background and helped to cover up the ink.


The next card has a softer feel to it, especially since I used vellum as part of the cutout window on the front of the card.  I colored the image using this technique that again helped with keeping the image from Love Blooms soft and muted.


I used my trusty foam tape to prop up the top panel so the vellum could get a little light behind it.  I love the combination of the black embossed image and the softness of the color of the rose.


This card used a combination of a stamp from Love Bites and papers from various Club Scrap kits.  I first stamped the heart image on the papers I wanted to use, then fussy-cut around the image.  I used foam tape to give some dimension to the hearts.  This is a great way to use up any scraps you may have that you just can't bear to part with!


The next card just uses one of my favorite fonts that Club Scrap released.  It's very, very simple, but I love the result!  I find that if you make sure your repeating pattern goes off the page on the edges, it gives it a more put-together look. I always keep that in mind when making cards!  I really love how the pop of the neon pink sentiment looks against the gray pattern.


Finally, I couldn't make Valentine's Day cards for my gal pals and not include one for my boyfriend.  As he had to help me pack and unpack my scraproom, he knows how I feel about my crafting supplies and where he fits in.  This sentiment from Love Bites is just perfect!  I used the same stamp as I used on the third card to make the heart background, then I stamped the sentiment in India Black ink and also used black embossing powder to set it apart from the background.  Hope Jason likes it!  (ETA: He did.  He did say "...Most of your crafting supplies??"  Hahaha.)

Thanks for stopping by so I could show off the wonderful Valentine's Day collections from Club Scrap and I hope you might try your hand at recreating some of these cards for yourself!  Luckily for you, the Love Ink collection is still available in full, and you can get the stamp sets for Love Blooms and Love Bites, so run to the store and grab them before they are gone!  If you do create your own projects, be sure to link them up at the Club Scrap blog for a chance at an awesome prize!

Hop on over to the wonderfully creative and talented Hetty to see what lovely project she has to share with you.  Stop by throughout this month and on the 25th to see this month's collection London Calling being showcased and another blog hop!

Card #1 Supplies // Paper: Club Scrap: Red (Up, Up & Away), Teal (Lock & Key), White / Inks: Club Scrap: Ruby, Fuchsia, and Carnation Hybrid InksIndia Black Ink / Stamps: Club Scrap: Love BloomsTools: Inkadinkado Stamp-A-Ma-JigFoam tape, Watercolor pencils, Water brush

Card #2 Supplies // Paper: Club Scrap: White, Pink (Birds of a Feather); Recollections: vellum / Inks: Club Scrap: India Black Ink / Stamps: Club Scrap: Love Blooms Tools: Foam tape, Heat gun, Black embossing powder, Embossing buddy, LePlume markers

Card #3 Supplies // Paper: Club Scrap: White, Red Handmade (Gratitude), Red plain (Peacock), Red pattern (Take Wing) / Inks: Club Scrap: India Black Ink / Stamps: Club Scrap: Love BitesTools: Cutterbee scissors

Card #4 Supplies // Paper: Club Scrap: Black (Matrix), White / Inks: Club Scrap: Ash and Neon Pink Hybrid Inks / Stamps: Club Scrap: Concrete Jungle Font Art / Tools: Inkadinkado Stamp-A-Ma-Jig

Card #5 Supplies // Paper: Club Scrap: White / Inks: Club Scrap: WOW Red Hybrid Ink, Ruby, Fuschia, and Carnation Hybrid InksIndia Black Ink / Stamps: Club Scrap: Love Bites / Tools: Inkadinkado Stamp-A-Ma-JigHeat gunBlack embossing powderEmbossing buddy

February 8, 2015

Club Scrap Artist Team - and London Calling!

 photo Artistteambadge_rsz_zpsee8cbeff.jpg

Aaaaaand I'm a week (well, six days) late in announcing this, but I am officially a member of the brand new Club Scrap Artist Team!  I have been a member of Club Scrap since April of 2008 and it is such an honor to have the opportunity to showcase my most favorite-est monthly kit club.

If you've frequented this blog, you'll see that a lot of my scrapbook pages, cards, and projects are made with Club Scrap supplies - I love their papers because they use high-quality, beautiful cardstock, have unique, exclusive patterned paper and cutaparts, and their stamps are made with amazing red rubber (great for those very detailed designs!)  I've consistently received their Lite kit for many years (perfect for just a taste of this club month by month), but as an Artist Team member I'll also be showing off the full Deluxe kit during my term.  I'm so excited for this month's kit - London Calling!  It's perfect for documenting a trip to London (obviously), but the pastel color palette is also great for spring pictures, outdoor snapshots, and general travel memorabilia as well.


This month I'm loving the mix of the watercolor backgrounds with the iconic views of London, the adorable stamp images such as the mustache, Wellies, and the "Keep On..." slogan, and my absolute favorite, this Underground washi tape.  I've just broken into this kit, so I made a quick and simple card for a friend who recently had a baby boy.


Obviously, I wanted to feature that adorable mustache stamp, so I paired it with a die-cut bowtie and a quick stamped sentiment and I was good to go!  (If you don't have a similar die or cut file, but you do have a Envelope Punch Board, you can make a similar bow using this technique.)  I love the subtle green pattern on the cream paper, and the detailed texture on the light green paper adds a bit of interest to a solid cardstock.


I added some foam tape under the mustache and the folds of the bow tie to add some dimension and help the bow tie keep its shape.  I think that the shades of the blue and green in this card makes it great to greet a new baby with!

Keep checking back this month to see more details of the London Calling kits!

Supplies // Paper: Club Scrap: Green Patterned, Blue, Light Green (London CallingInks: Club Scrap: India Black Ink /  Stamps: Club Scrap: London Calling Collection; Lowercase alphabet stamps (similar) / Tools: Studio Calico: Bow craft die;  Foam tape

February 2, 2015

Club Scrap Card Sketch Challenge - February 2015


New month, new sketch at the Club Scrap forums!  As I was setting up my new craft room, I got inspired to use a lot of patterns on one card, whether it be patterned paper, stamps, or stencils.  It's a fun way to use a lot of fun products in one card.  I ended up with a card with a bright color palette, but I kept the stamps I used somewhat subtle.  By using a tone-on-tone look on all three panels, I was able to use bold patterns without being too overwhelming.


I had fun with a bright and cheery mix of pink, orange, and yellow - perfect for a cold and wintry day!


I had colored bottle caps and circle cutaparts in my stash from a previous Club Scrap kit.  I ran the bottle cap through my Big Shot to flatten it a bit - I really like how it turned out!  I used pop dots to adhere it snugly to the card.


I had some black faceted jewels (aka my bling) in my stash that I used on the bottom panel to even out the large embellishment on the top panel.  And while I haven't forgotten anyone's birthday yet (I think), this snarky sentiment is always handy to have around, just in case I'm not quite on top of things.

I hope you can join in on the challenge thread this month!

Supplies // Paper: Club Scrap: Black (Matrix), Pink (Graffiti - on sale!), Orange (All That Jazz), Yellow (Fire & Ice) / Inks: Club Scrap: Fuschia, Tangergine, and Topaz Hybrid Inks, India Black Ink / Embellishments: Club Scrap: Bottlecap and cutaparts (Bold Blooms), Bling from stash / Stamps: Club Scrap: Tilescapes, Hopes, Crusin', Peacock  / Tools: Inkadinkado Stamp-A-Ma-Jig, Sizzix Big Shot, Pop dots

January 22, 2015
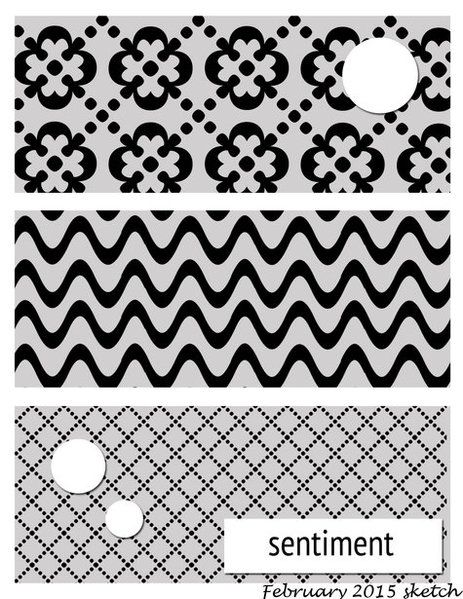
Club Scrap Card Sketch Challenge - January 2015


I'm back again hosting the Card Sketch Challenge over at the forums on Club Scrap.  Here's the sketch I came up with for January - done a little differently than usual.  I normally make the card first, then create the sketch, but my craft room was still in a state of disarray at the beginning of the month, so I had to stick with just the sketch for the first few weeks!


I used this pin as a jumping off point for my color palette.  I was happy that I got to use a lot of different papers from my stash for this card, plus a lot of stamps from one of my favorite Club Scrap collections, Full Circle.


I wanted to add some subtle dimension to this card, so I pulled the edges up from the hand-cut, wonky circles and the three vertical strips.  I love how the circles turned out - I deliberately wanted them not to be perfect and look very handmade.

I hope you all can join in on the challenge over at the forum!  See you there!

Supplies // Paper: Club Scrap: Gray (Welcome), Teal (Navajo), Lime (Painted Desert), Light Blue (Cyprus)Inks: Club Scrap Ash, Peridot, and LagoonEmbellishments: MME Enamel Dots - Cut and Paste AdorbsStamps: Full Circle/ Tools: Ink Applicators

August 3, 2014

31 Days of Cards - Day 3


This card is a more colorful variation on yesterday's card.  I used the same stamp and my collection of neon inks to create the main panel.  This was a fun card to make and I used it in another challenge at Club Scrap - Pam's NBUS challenge.  This is such a good challenge to make you dig through your stash and actually use it!  I have a few never-before-used-stuff in my stash that I hope to tackle this year...

August 2, 2014

31 Days of Cards - Day 2


Day 2!  Another simple card, but I really like how this turned out.  I got to play around with my Stampamajig and my Copics, so I'm happy!  Simple and clean.  This card is also based on the sketch for this month's challenge over at Club Scrap. Go check out the sketch and join in on the fun!

August 1, 2014

31 Days of Cards - Day 1


I have been ignoring the crafting/blogging world for far too long this summer, so I challenged myself to make a card for every day in August.  I find that cards are an easy and quick way to get a technique, stamp, or supplies used, and they usually help me jump-start my creativity.

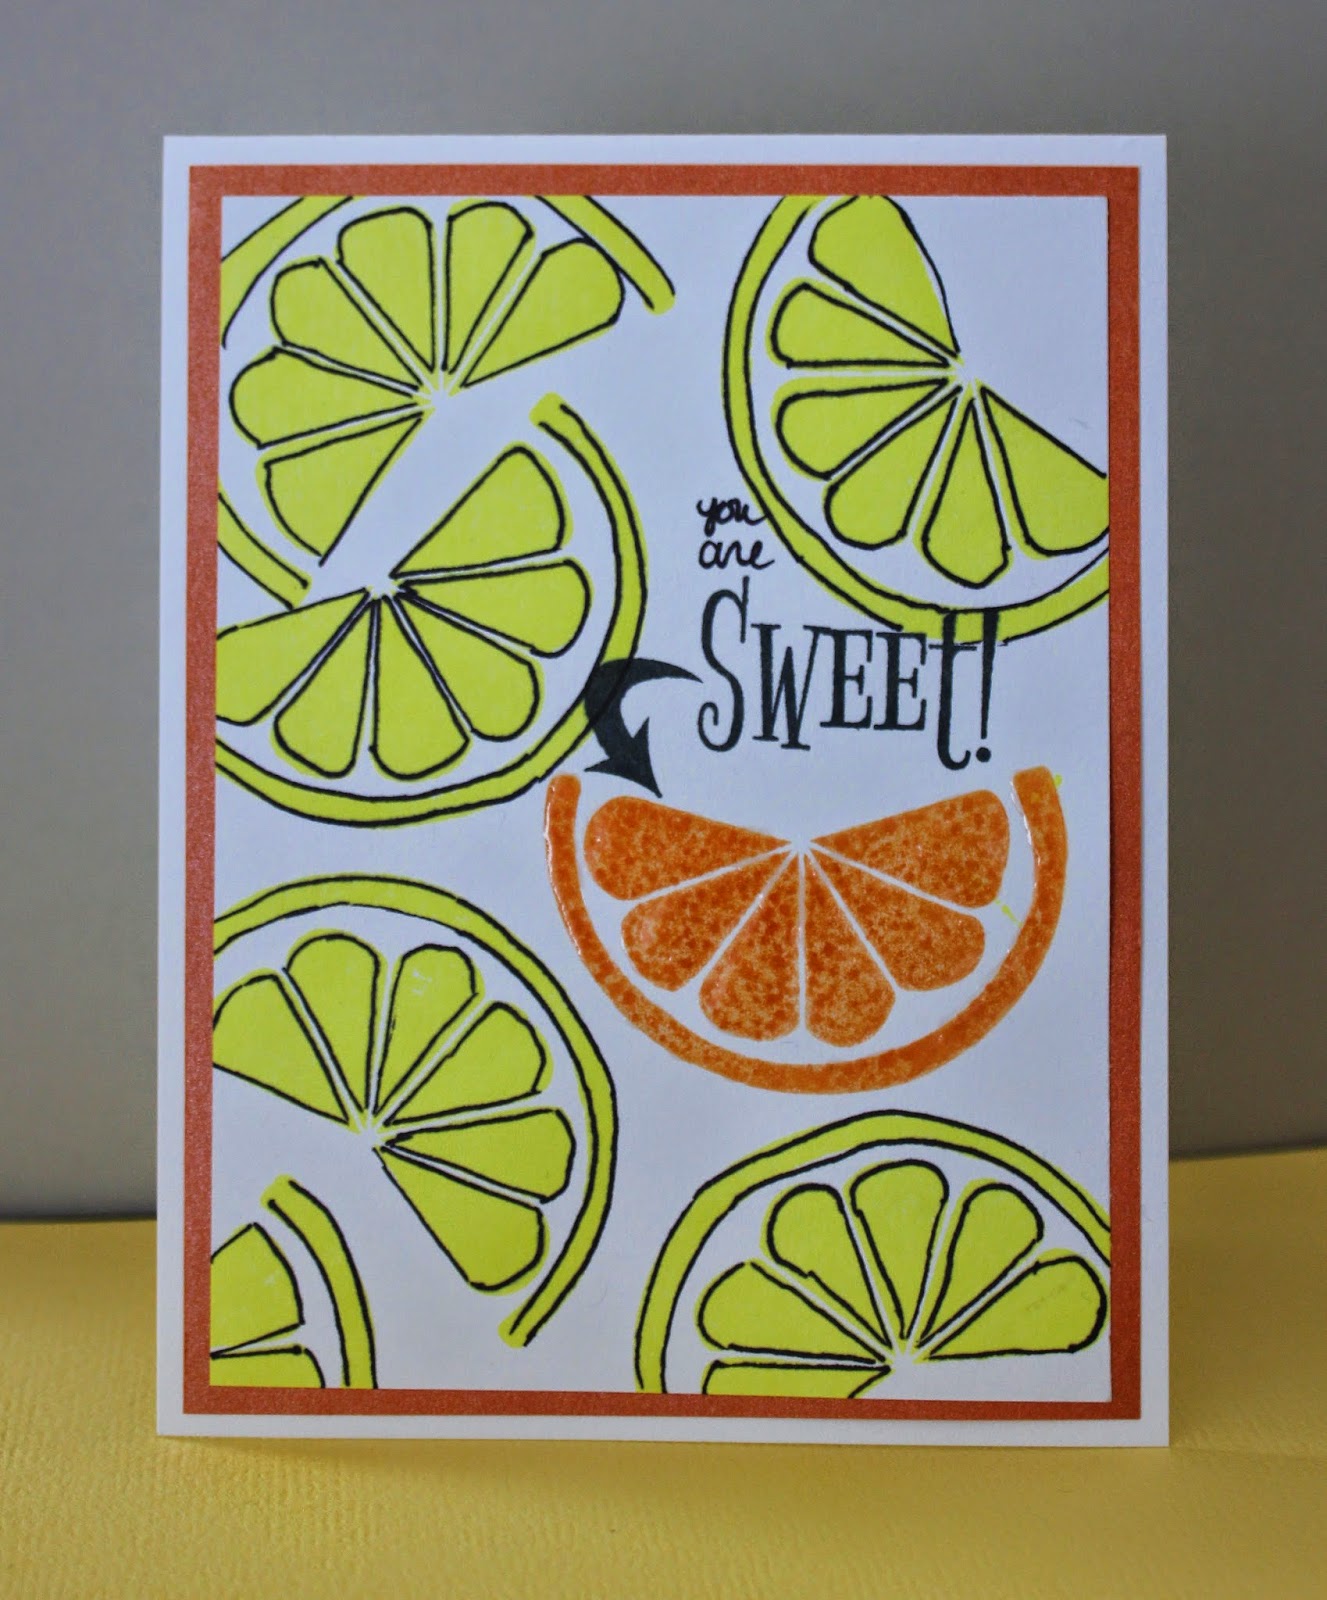
My first card is pretty simple - I stamped the same citrus slice several times in neon yellow and orange ink and outlined the yellow slices with a marker.  It's hard to tell from the picture here, but I covered the orange image in Glossy Accents for some interest.  I stamped the sentiment in black ink and hand-wrote "you are" above it. 

I'm not in love with this card, but it's a start!  One down, thirty to go.  Check back daily for a new card!

April 30, 2014

Club Scrap Blog Hop - Hydrangeas

 photo hydrangeas_hop_badge_rsz_zps8964cf2c.jpg

Hi there!  Welcome to the Hydrangeas blog hop! This month we're using Club Scrap's Hydrangeas collection.  I'm going to show you how I was inspired to use all things watercolor in my cards this month.

If you traveled here from Lisa's blog, then you are following the hop!  If you've lost your way or just want to see all the links in one place, head over to the Club Scrap Creates blog to see a list of all the talented bloggers participating today.

As now is my monthly routine, on the first of the month I created a mood board based on the theme and colors of the kit, and was really loving all of the beautiful examples of watercolors out there:

Follow Marya Kaszubinski's board Hydrangeas Mood Board - Club Scrap April Kit on Pinterest.

I knew I wanted to try to use one element of watercolors in each of my cards and while I had plenty of materials to work with, I focused on making four cards for upcoming events - Mother's Day and birthdays.  I used papers, embellishments and stamps from the Club Scrap kit and the instructions Tricia provided for the Assembly Line Card Making for February's kit, Big Deal.

I first tried out all of my watercolors on a test swatch to see what I was working with.  I'm now storing this is my handy-dandy notebook that we made at Retreat in 2013:


Then I got off to work assembling cards and using my traditional watercolors, my watercolor crayons, and my watercolor pencils.  So many mediums to choose from!


For my first card, I stamped the chevron from the Art Nouveau stamp set multiple times across watercolor paper.  I then colored in the spaces using watercolor crayons and a paint brush.  Instead of coloring directly on the paper, I rubbed the crayon on a non-stick surface and used a wet brush to pick up the paint from there.  I also made a mottled background with the same colors by painting with the watercolor crayon, then going back over with clean water.


I also cut out the "Happy Birthday" sentiment on my electronic die cutter machine in the same font that matches this month's kit.  I love how happy this card turned out!


For my second card, I used the print with the embossed flowers and colored these in with watercolor pencils.  I colored directly onto the paper, then used water and a brush to spread the color around.  To finish the card off, I took a waterbrush and the pencils I used to color the images in and flicked the color from the end of the pencils onto the paper.  I love the little splatters this creates!


For this card, I knew I wanted to color in this wonderful hydrangea image from the Borders and Backgrounds stamp set.  I first tried to stamp the image and then color it in with watercolors, but that covered up the stamped lines too much.  Instead, I took two pieces of watercolor paper and used purple and green to cover the whole piece, and once dried, I stamped over these with India Ink.  I then cut out the image and adhered with flat and dimensional adhesive.


I also used a special technique to get this variegated look to the colors.  Once you have put down your watercolor, make sure the paint is still pretty wet.  Then flick or drop alcohol onto the wet paper, and the water will react and move away, leaving some of the color behind.  It's science!  (And pretty cool!)


Finally, for my last card, I created an ombre background using my watercolor crayons and I cut another sentiment out of the same font.  (Did you know that on the first of the month, Club Scrap posts all the details of the kit, including a link to the font used?  Go check some out here!)  I left this sentiment plain, and I really like the stark contrast of the white against the springy ombre.

Thank you so much for stopping by!  I hope you drag out your watercolors (because I know you all have these in your stash.  Maybe even several sets...) and try to add some colorful elements in your cards, layouts, and projects.  And even though today is the last day of April, be sure to post your watercolor creations in Pam's challenge thread over at the Coffeehouse - hope to see you there!

Now head on over to Annette Dragon's to see what she has to share this month.  Come back in May when we're getting comfy with Club Scrap's Dungarees collection!


09 10